CFD simulations involving 3D complex geometry have become the norm, however, this hasn’t lessened the…
Porting a new solver to Caelus
I’ve been meaning to write an article about SCons and was having a hard time deciding how to present it. And procrastination might have been a factor as well. Anyway, a @caelus_cml twitter follower asked about porting a custom OpenFOAM solver to Caelus so explaining how do to that might be the best way to get started.
Being a fork of OpenFOAM, the code structured of Caelus differs very little. The most obvious items that differ are the namespace (CML), cpp/hpp file extensions, and of course the SCons build system. The most helpful way to show how to port a solver will be to convert one that wasn’t included in Caelus. The popular interFoam seems like a good candidate.
Since Windows is the newest platform to the open-source CML world, I’ll use it for this demonstration. Our Linux and Mac brethren will be well versed in their own methods for creating, navigating and editing files. I installed Caelus 4.10 to C:CaelusCaelus-4.10 so that location will be my top level directory.
The first step will be to create a directory for it in srcapplications. To keep the solvers organized, I will create a multiPhase directory and from within that a vofSolver directory.
Next I will copy all source and header files from interFoam, change the source file extensions to cpp, the header file extensions to hpp, and finally rename the main source file to vofSolver.cpp. I am using the name vof because it quickly identifies the physics it models (inter is a little ambiguous). I don’t need the wmake files to build but they’ll come in handy latter when we setup the SCons files. Here’s what it looks like so far in Windows Explorer.

The next major step will be to go through all the files and rename the extensions from H to hpp. I’m using Notepad++, so find and replacing the extensions is as quick as opening all the files and globally replacing H” with hpp” (Tip: keep the trailing ” in the search expression so the .H() function isn’t inadvertently replaced and Match case is checked on). The last thing to check for is usage of the Foam namespace and replace it with CML. In this case, it’s not used.

At this point, the source files have been renamed and modified to reflect the Caelus naming convention. Now we will need to setup the SCons build files. SCons uses two main files to build applications (or libraries): an SConstruct and SConscript. I should also mention that since SCons uses Python, you have all the facilities of Python at your disposal. The SConstruct files are scripts that SCons uses to build the applications whereas the SConscript file contains the specific details about include directories, link libraries, application name and application location. In this case, I’m going to modify the existing SConstruct file in the srcapplications rather create a new one since I created the new solver directory there.
I’m highlighting the section in the applications SConstruct (toward the end) that needs to be modified. subdirs is simply a Python list and the path to the new solver needs to added. For clarity, I’ve added it after the existing solvers but before the utilities. There is also another SConstruct file within the srcapplicationssolver directory that should be modified in the same manner.
[python firstline=”297″ title=”SConstruct file”] #===============================================================================# Sub-directories to traverse for compile
#===============================================================================
subdirs = [
‘solvers/basic/potentialSolver’,
‘solvers/heatTransfer/buoyantBoussinesqSimpleSolver’,
‘solvers/heatTransfer/buoyantSimpleSolver’,
‘solvers/incompressible/simpleSolver’,
‘solvers/incompressible/simpleSolver/SRFSimpleSolver’,
‘solvers/incompressible/pisoSolver’,
‘solvers/incompressible/pimpleSolver’,
‘solvers/incompressible/pimpleSolver/SRFPimpleSolver’,
‘solvers/multiPhase/vofSolver’,
‘utilities/mesh/advanced/autoRefineMesh’,
‘utilities/mesh/advanced/collapseEdges’,
‘utilities/mesh/advanced/combinePatchFaces’,
[/python]
The easiest way to create the SConscript is to copy an existing one and modify it. I grabbed the SConscript from solversincompressiblepimpleSolver and copied it into the new solver directory.
Now edit the copied SConscript and replace all instances of the string pimple with vof. Next, add/modify the include and link library locations to correspond to what the solver needs. This is where the wmake options file from interFoam comes in handy. Simply edit the lib_inc and lib_link list variables to correspond to the options file from interFoam. It turns out only interfaceProperties needs be to added lib_inc and lib_link and twoPhaseInterfaceProperties to lib_link. Note: the interfaceProperties link library only needs to be explicitly added for Windows due to the default way Windows searches for external library symbols. The full explanation is outside the scope of this post but I’ll follow up with details in a subsequent post. I’m highlighting the section from the SConscript file that I modified.
[python firstline=”12″ title=”SConscript file”] #===============================================================================# Additions to include directories for this executable
#===============================================================================
lib_inc = [src + ‘/turbulenceModels/incompressible/turbulenceModel’,
src + ‘/turbulenceModels/incompressible/turbulenceModel/lnInclude’,
src + ‘/transportModels’,
src + ‘/transportModels/incompressible/singlePhaseTransportModel’,
src + ‘/transportModels/incompressible/lnInclude’,
src + ‘/transportModels/interfaceProperties/lnInclude’
] vofSolEnv.Prepend(CPPPATH = lib_inc)
#===============================================================================
# Additions to link libraries for this executable
#===============================================================================
if vofSolEnv[‘WHICH_OS’] == “windows”:
vofSolEnv.Prepend(LINKFLAGS = ‘ -u incompressibleRASModelsLoad -u incompressibleLESModelsLoad’)
lib_link = [‘libincompressibleTurbulenceModel’, ‘libincompressibleRASModels’,
‘libincompressibleLESModels’,’libincompressibleTransportModels’,’libinterfaceProperties’,
‘libtwoPhaseInterfaceProperties’] else:
lib_link = [‘libincompressibleTurbulenceModel’, ‘libincompressibleRASModels’,
‘libincompressibleLESModels’,’libincompressibleTransportModels’,’libtwoPhaseInterfaceProperties’] vofSolEnv.Append(LIBS = lib_link)
[/python]
The last step is to compile the new solver from a command window using SCons. If the Caelus environment is setup properly, scons.py will be in the path. Therefore, from within the srcapplications directory, simply type scons.py install. Note, the Caelus library objects must already exist. If not, from the top level directory type BuildCaelus.py to build everything (Tip: to speed up the compilation, build Caelus in parallel with the -p <# procs> parameter).
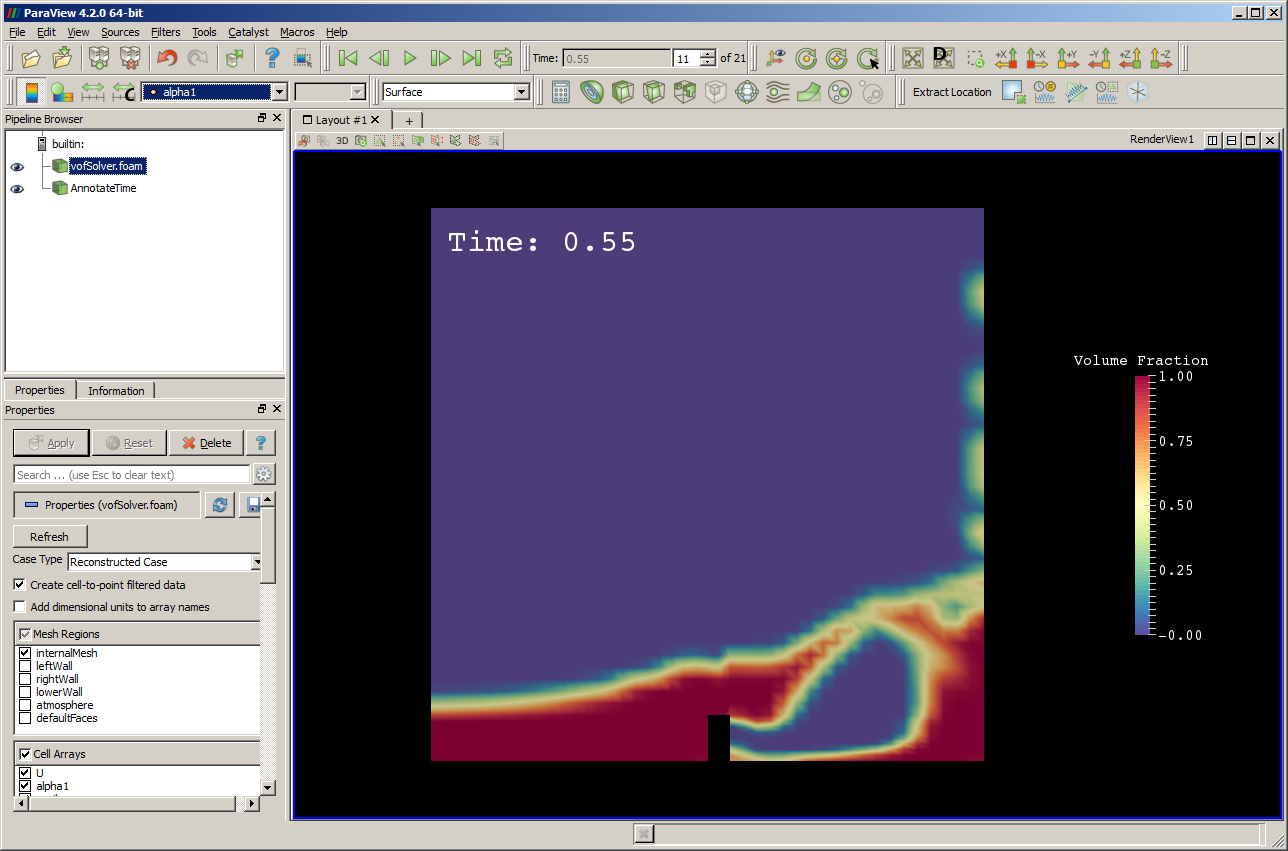
If your solver compiles successfully it will be installed into the Caelus bin directory. This location is in the path and will thus be available to run immediately. Here’s a screenshot of vofSolver solution for the damBreak tutorial.
Regarding SCons, the take away here is to find, modify and reuse existing Caelus SConstruct and SConscript files for your new application or library. As you get more familiar using SCons in Caelus, you may want to learn more. I’d suggest starting with the SCons documentation.
Let me know if you were able to port your solver or you have any other questions. If you are a twitter user, be sure to follow @caelus_cml for regular updates on Caelus happenings.
-Chris
Related Posts

2.
Porting a new solver to Caelus